Monday, March 12, 2012

Three Chickadees


"Three Chickadees"
7"x10" Print of a watercolor
Purchase $40


This print of "Three Chickadees" is a limited edition print and it comes signed, numbered, and matted to fit an 11"x14" frame. 
The print can be purchased through PayPal by clicking the above link or you can email me at livewiregrafx@yahoo.com and let me know you are interested in purchasing this print. 

Tuesday, February 28, 2012

Golden Iris on Daily Paint Works


"Golden Iris"
For Sale $50 plus shipping SOLD
5" x 5" ~ Watercolor on Paper
This is being auctioned off at DailyPaintWorks.com with a starting bid of $50.

I have now joined the Daily Paint Works site. This is my first painting available for purchase at the DPW Gallery.
Spring is on it's way and this painting of the warm "Golden Iris" reminds me that winter will not last forever! This painting will come matted in an off white mat and ready for framing in a 9" x 9" frame.
The Auction lasts seven days, after this you can email me at livewiregrafx@yahoo.com and let me know you are interested in purchasing this painting.

Friday, February 17, 2012

Transparent Watercolor Society of America 36th Annual exhibition

Shows Over    ©2011 LWatry
Great News! My painting, "Shows Over", was juried into the 36th Annual Transparent Watercolor Society of America (TWSA) exhibit. The show will be held at Kenosha Public Museum in Wisconsin from May 5 to August 5, 2012
    The TWSA began in 1976 by Nora Stevens and Sybil Olson and was named the Midwest Watercolor Society. In 2003 the society was renamed the TWSA because they had gone from  regional status to national. Famous watercolorists were and are members of the TWSA like: Nora Stevens, Frank Webb, Cheng-Khee Chee, Irving Shapiro, Zoltan Szabo and Phil Austin.
    The TWSA mission statement says, "From its inception, the purpose of the Transparent Watercolor Society of America has been to advance the stature and foster appreciation of watercolor as a major medium."
    The TWSA show only juries in paintings that are done completely with transparent watercolor. No other medium can be used and even the pencil lines must be minimally visible. If you would like to see paintings from other recent TWSA exhibitions, click this link http://www.watercolors.org/ and scroll down on their home page until you get to the Recent Exhibitions section. There are some amazing watercolors!
    If you would like to see how my painting, "Shows Over", came into being, I posted the demo from February to March in 2011 to this blog and here are the links:
http://lorrainewatry.blogspot.com/2011/02/my-newest-adventure.html
http://lorrainewatry.blogspot.com/2011/02/adventure-continues.html
http://lorrainewatry.blogspot.com/2011/02/painting-silver-adventure-home-stretch.html
http://lorrainewatry.blogspot.com/2011/02/painting-silver-adventure.html
http://lorrainewatry.blogspot.com/2011/03/abstractions-in-silver.html
http://lorrainewatry.blogspot.com/2011/03/painting-silver-in-watercolor-finale.html

Monday, February 13, 2012

Watercolor Video of a Garden Scene

I have a 2 new YouTube videos, part 1 and part 2 of a Garden Scene that I am demoing for a class. I took the photo of this scene at the Denver Botanic Gardens. There are some large pots tipped over and some are half buried with flowers and grasses growing around them. This painting is being done on Arches 140lb. cold press paper and I have stretched it and stapled it to Gator Board. After I finish the demo for the class, I will upload the rest to YouTube. Thanks, please let me know what you think. To watch this video on YouTube, click this link:  http://lorrainewatry.blogspot.com/p/my-videos-on-you-tube.html
or you can watch the video on this blog from My YouTube Videos Tab.

Thursday, February 9, 2012

Color Wheel For Watercolor

Whether you are just starting out in watercolor or you have been painting for a while, it never hurts to take some time and make yourself a color wheel. A color wheel for the beginner is necessary to understand the relationship of the three primaries - red, blue, and yellow and all of the colors that can be made from them. For the more advanced watercolor student, the color wheel can help remind you that there are many more colors to be made than just the ones you have on your palette.
Here is the nitty-gritty of any color wheel.
Primaries:  There are 3 colors that all other colors can be made from. They are Red, Blue, & Yellow.
Secondaries: There are three secondaries. Secondaries are made by mixing two of the primaries together. Red & Blue make purple, Yellow & Red make orange, and Yellow & Blue make green.
Tertiaries: These colors are made by mixing a secondary color and a primary color together. For example: Yellow and orange make a yellow-orange. There can be many many tertiary colors.
Complimentary Colors: These are the colors that sit across from each other on the color wheel. There are 3 sets of complimentary colors. They are Blue & orange, Red & green, and Yellow & purple. By mixing the two complimentary colors together you get a more neutral or grayed down mix. These neutral colors can be wonderful colors in a painting and can make great grays and browns that have some life about them.

The color wheel you see in this post was painted by me with three primaries: French Ultramarine, Permanent Rose, and Lemon Yellow. Please feel free to print this image so that you can use it to do your own color wheel.  

For the more advanced watercolor student - this watercolor wheel was done using 3 "cool" primaries, but it can also be done using 3 "warm" primaries. Three colors that are considered "warm" primaries would be Phthalo Blue, Winsor Red (same as Pyrro Red - Daniel Smith or Permanent Red - Daler Rowney), and New Gamboge Yellow. However, I don't care for the "warm" primaries color wheel. You will get less vibrant colors.  Also, definitely try some complimentary mixes and see all the wonderful neutral colors you can make.

Friday, January 20, 2012

How to Stretch Watercolor Paper

You may have heard the term "Stretch Your Watercolor Paper". This does not mean: you will make your paper last longer, nor does it mean you are grabbing it's little paper arms and helping it stretch. :) (Sorry for my little bit of humor there.) What stretching your paper means, as most of you may know, is to wet it and attach it to a surface to keep it from buckling when you paint on it.

Why, you ask, do I need to stretch my watercolor paper? The answer is, you don't. It totally depends on what weight paper you use and whether the paper buckling while you paint bothers you. I use 140lb. Arches, cold press paper for most of my paintings and this weight of paper or lower will buckle if it gets really wet. So, since I like a smooth surface to paint on, I stretch my paper. As I said depending on the weight of the paper, you don't need to stretch it. If you don't want to mess with stretching the paper, try 200lb. or 300lb. paper.

The Stretching Process: It used to be, in order to stretch your paper that you had to use a paper tape that you wet and a masonite board to attach it to. This was a messy process and it didn't always work that well. Then someone decided you could stretch your paper by stapling it and things improved a little, but you couldn't use masonite because you couldn't staple into it. So, I used a heavy piece of board that I had to seal with polyurethane to keep it from warping and the staples didn't always go in easily. Now, however, they have come out with a surface called "Gatorboard". Gatorboard has a foam core interior with a hard exterior surface on the front and back that can be easily stapled into. Gatorboard can be used over and over and you can use both sides of the board. It doesn't warp and it is light weight. You can even cut it down to make smaller surfaces.

Here is my process:
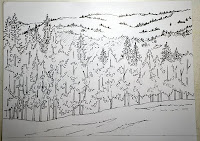
Drawing that is inked ©2012LWatry
1. I do my drawing on a piece of drawing paper. This way I can work at a comfortable size and I can erase and make all the changes needed before putting it on the watercolor paper. I then take my finished drawing and use a black ink pen to go over the lines to darken it. If I want to do a large painting, I can take this drawing and enlarge it at a copy store or scan it in at home and print it out in sections.
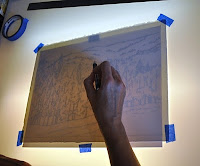
Transferring Drawing on Light Table  ©2012
2. The next step is to use my light table to get the drawing on my watercolor paper (Arches 140lb. cold press). If you don't have a light table you can place your drawing in a sunlit window and then tape your watercolor paper over it. You will be able to see the lines of your drawing, if they are dark enough. You can even use this drawing transfer method on 300lb. paper. When I am transferring the drawing, I make sure to draw lightly on the watercolor paper because I don't want dark lines in my finished painting and after the paper has been stretched the pencil is not as easy to erase.
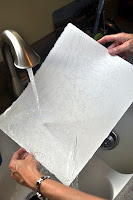
Wetting Front ©2012
Wetting Back ©2012
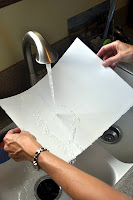
3. I then take the watercolor paper with the drawing on it to the sink. If the paper won't fit under the kitchen sink, I use a wallpaper tray from the hardware store to soak it. I use warm water and begin wetting both sides of the paper. One caution, don't touch your watercolor paper to any of the sink or faucet surfaces while you are soaking it. If there is any soap or other residue on these surfaces they could transfer to your paper and act as a resist when you go to paint. I will continue to wet both sides of the paper for 2 to 3 minutes until the paper flops over when you hold it up.
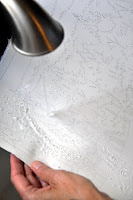

Wetting the Paper ©2012
4. Now that the paper is thoroughly wet on both sides, I take it over to the table and place it on my gatorboard. You can purchase gatorboard in 16"x24" or 24"x32" sizes. Check with your local art store or order online at sites like:  www.aswexpress.com or www.cheapjoes.com  Then I open out my stapler and start on one of the longest sides, if it is a rectangular piece of paper. I staple about every 1 1/2 to 2 inches. I may place more staples if it is a larger piece of paper because as the larger paper dries, it tends to pull more. I staple all the way around the watercolor paper. Do not pull on the paper as you staple.
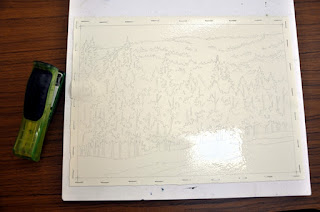
Watercolor Paper Stapled onto Gatorboard ©2012LWatry

5. After you have stapled the paper down, if you feel like it needs a little more water, you can spray it with a spray bottle. The paper will have some buckling, which may occur even while you are still stapling it. Do not panic, as the paper starts to dry it will shrink a little and most, if not all, of the buckling will disappear. Now is the time to be patient and let the paper dry fully. You can set your board in a sunny window or outside on a good day to help speed up the drying time. When you think the paper is dry, touch the paper with the back of your hand (the front of your hand could leave oils on the paper). If the paper is cool to the touch, it is still wet and needs to dry some more. If, however, you are planning on doing a soft, out of focus wash, you could do this before the paper is completely dry. Experiment on a smaller piece of paper before attempting this, so that you know the right conditions to start painting. Once the paper is completely dry you can apply masking if you are using it. Do not apply masking while the paper is wet because it can pull off the surface of the paper when you go to remove it.

Hope this Stretching Paper Tutorial helps. If you have any questions, please leave a comment and I will get back to you.

Friday, January 6, 2012

Have You Ever...A Look into the Everyday Life of an Artist

It has been a while since I posted a "Have You Ever", so I have decided to post three. I would love to hear your art related "Have You Ever's".

Have You Ever... been at an event where something else is going on besides art and started thinking about what colors to use to paint what you see?

Have You Ever... waited until the last minute to finish a painting, take pictures, and enter a juried show? (Now, in this day of digital entries, I have a quick way to enter a show... even if I have waited until the last minute!)

Have You Ever... forgotten to do the laundry, make dinner, or change out of your p.j.'s because you are so involved with the piece you are working on?