You may have heard the term "Stretch Your Watercolor Paper". This does not mean: you will make your paper last longer, nor does it mean you are grabbing it's little paper arms and helping it stretch. :) (Sorry for my
little bit of humor there.) What stretching your paper means, as most of you may know, is to wet it and attach it to a surface to keep it from buckling when you paint on it.
Why, you ask, do I need to stretch my watercolor paper? The answer is, you don't. It totally depends on what weight paper you use and whether the paper buckling while you paint bothers you. I use 140lb. Arches, cold press paper for most of my paintings and this weight of paper or lower will buckle if it gets really wet. So, since I like a smooth surface to paint on, I stretch my paper. As I said depending on the weight of the paper, you don't need to stretch it. If you don't want to mess with stretching the paper, try 200lb. or 300lb. paper.
The Stretching Process: It used to be, in order to stretch your paper that you had to use a paper tape that you wet and a masonite board to attach it to. This was a messy process and it didn't always work that well. Then someone decided you could stretch your paper by stapling it and things improved a little, but you couldn't use masonite because you couldn't staple into it. So, I used a heavy piece of board that I had to seal with polyurethane to keep it from warping and the staples didn't always go in easily. Now, however, they have come out with a surface called "Gatorboard". Gatorboard has a foam core interior with a hard exterior surface on the front and back that can be easily stapled into. Gatorboard can be used over and over and you can use both sides of the board. It doesn't warp and it is light weight. You can even cut it down to make smaller surfaces.
Here is my process:
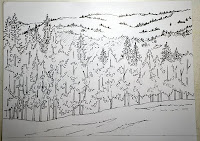 |
| Drawing that is inked ©2012LWatry |
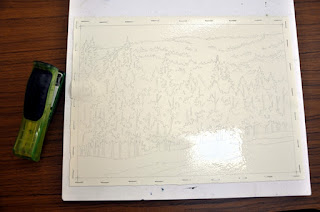
1. I do my drawing on a piece of drawing paper. This way I can work at a comfortable size and I can erase and make all the changes needed before putting it on the watercolor paper. I then take my finished drawing and use a black ink pen to go over the lines to darken it. If I want to do a large painting, I can take this drawing and enlarge it at a copy store or scan it in at home and print it out in sections.
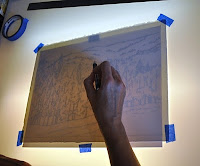 |
| Transferring Drawing on Light Table ©2012 |
2. The next step is to use my light table to get the drawing on my watercolor paper (Arches 140lb. cold press). If you don't have a light table you can place your drawing in a sunlit window and then tape your watercolor paper over it. You will be able to see the lines of your drawing, if they are dark enough. You can even use this drawing transfer method on 300lb. paper. When I am transferring the drawing, I make sure to draw lightly on the watercolor paper because I don't want dark lines in my finished painting and after the paper has been stretched the pencil is not as easy to erase.
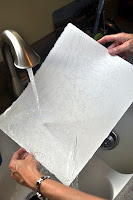 |
| Wetting Front ©2012 |
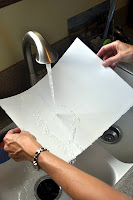 |
| Wetting Back ©2012 |
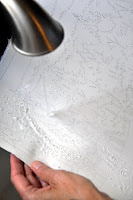
3. I then take the watercolor paper with the drawing on it to the sink. If the paper won't fit under the kitchen sink, I use a wallpaper tray from the hardware store to soak it. I use warm water and begin wetting both sides of the paper.
One caution, don't touch your watercolor paper to any of the sink or faucet surfaces while you are soaking it. If there is any soap or other residue on these surfaces they could transfer to your paper and act as a resist when you go to paint. I will continue to wet both sides of the paper for 2 to 3 minutes until the paper flops over when you hold it up.
 |
| Wetting the Paper ©2012 |
4. Now that the paper is thoroughly wet on both sides, I take it over to the table and place it on my gatorboard. You can purchase gatorboard in 16"x24" or 24"x32" sizes. Check with your local art store or order online at sites like:
www.aswexpress.com or
www.cheapjoes.com Then I open out my stapler and start on one of the longest sides, if it is a rectangular piece of paper. I staple about every 1 1/2 to 2 inches. I may place more staples if it is a larger piece of paper because as the larger paper dries, it tends to pull more. I staple all the way around the watercolor paper.
Do not pull on the paper as you staple.
 |
| Watercolor Paper Stapled onto Gatorboard ©2012LWatry |
5. After you have stapled the paper down, if you feel like it needs a little more water, you can spray it with a spray bottle. The paper will have some buckling, which may occur even while you are still stapling it. Do not panic, as the paper starts to dry it will shrink a little and most, if not all, of the buckling will disappear. Now is the time to be patient and let the paper dry fully. You can set your board in a sunny window or outside on a good day to help speed up the drying time. When you think the paper is dry, touch the paper with the back of your hand (the front of your hand could leave oils on the paper). If the paper is cool to the touch, it is still wet and needs to dry some more. If, however, you are planning on doing a soft, out of focus wash, you could do this before the paper is completely dry. Experiment on a smaller piece of paper before attempting this, so that you know the right conditions to start painting. Once the paper is completely dry you can apply masking if you are using it. Do not apply masking while the paper is wet because it can pull off the surface of the paper when you go to remove it.
Hope this Stretching Paper Tutorial helps. If you have any questions, please leave a comment and I will get back to you.


