Friday, January 20, 2012

How to Stretch Watercolor Paper

You may have heard the term "Stretch Your Watercolor Paper". This does not mean: you will make your paper last longer, nor does it mean you are grabbing it's little paper arms and helping it stretch. :) (Sorry for my little bit of humor there.) What stretching your paper means, as most of you may know, is to wet it and attach it to a surface to keep it from buckling when you paint on it.

Why, you ask, do I need to stretch my watercolor paper? The answer is, you don't. It totally depends on what weight paper you use and whether the paper buckling while you paint bothers you. I use 140lb. Arches, cold press paper for most of my paintings and this weight of paper or lower will buckle if it gets really wet. So, since I like a smooth surface to paint on, I stretch my paper. As I said depending on the weight of the paper, you don't need to stretch it. If you don't want to mess with stretching the paper, try 200lb. or 300lb. paper.

The Stretching Process: It used to be, in order to stretch your paper that you had to use a paper tape that you wet and a masonite board to attach it to. This was a messy process and it didn't always work that well. Then someone decided you could stretch your paper by stapling it and things improved a little, but you couldn't use masonite because you couldn't staple into it. So, I used a heavy piece of board that I had to seal with polyurethane to keep it from warping and the staples didn't always go in easily. Now, however, they have come out with a surface called "Gatorboard". Gatorboard has a foam core interior with a hard exterior surface on the front and back that can be easily stapled into. Gatorboard can be used over and over and you can use both sides of the board. It doesn't warp and it is light weight. You can even cut it down to make smaller surfaces.

Here is my process:
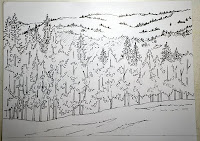
Drawing that is inked ©2012LWatry
1. I do my drawing on a piece of drawing paper. This way I can work at a comfortable size and I can erase and make all the changes needed before putting it on the watercolor paper. I then take my finished drawing and use a black ink pen to go over the lines to darken it. If I want to do a large painting, I can take this drawing and enlarge it at a copy store or scan it in at home and print it out in sections.
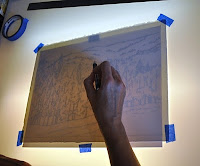
Transferring Drawing on Light Table  ©2012
2. The next step is to use my light table to get the drawing on my watercolor paper (Arches 140lb. cold press). If you don't have a light table you can place your drawing in a sunlit window and then tape your watercolor paper over it. You will be able to see the lines of your drawing, if they are dark enough. You can even use this drawing transfer method on 300lb. paper. When I am transferring the drawing, I make sure to draw lightly on the watercolor paper because I don't want dark lines in my finished painting and after the paper has been stretched the pencil is not as easy to erase.
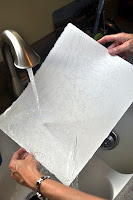
Wetting Front ©2012
Wetting Back ©2012
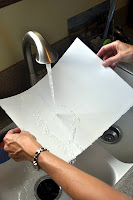
3. I then take the watercolor paper with the drawing on it to the sink. If the paper won't fit under the kitchen sink, I use a wallpaper tray from the hardware store to soak it. I use warm water and begin wetting both sides of the paper. One caution, don't touch your watercolor paper to any of the sink or faucet surfaces while you are soaking it. If there is any soap or other residue on these surfaces they could transfer to your paper and act as a resist when you go to paint. I will continue to wet both sides of the paper for 2 to 3 minutes until the paper flops over when you hold it up.
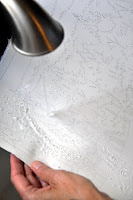

Wetting the Paper ©2012
4. Now that the paper is thoroughly wet on both sides, I take it over to the table and place it on my gatorboard. You can purchase gatorboard in 16"x24" or 24"x32" sizes. Check with your local art store or order online at sites like:  www.aswexpress.com or www.cheapjoes.com  Then I open out my stapler and start on one of the longest sides, if it is a rectangular piece of paper. I staple about every 1 1/2 to 2 inches. I may place more staples if it is a larger piece of paper because as the larger paper dries, it tends to pull more. I staple all the way around the watercolor paper. Do not pull on the paper as you staple.
Watercolor Paper Stapled onto Gatorboard ©2012LWatry

5. After you have stapled the paper down, if you feel like it needs a little more water, you can spray it with a spray bottle. The paper will have some buckling, which may occur even while you are still stapling it. Do not panic, as the paper starts to dry it will shrink a little and most, if not all, of the buckling will disappear. Now is the time to be patient and let the paper dry fully. You can set your board in a sunny window or outside on a good day to help speed up the drying time. When you think the paper is dry, touch the paper with the back of your hand (the front of your hand could leave oils on the paper). If the paper is cool to the touch, it is still wet and needs to dry some more. If, however, you are planning on doing a soft, out of focus wash, you could do this before the paper is completely dry. Experiment on a smaller piece of paper before attempting this, so that you know the right conditions to start painting. Once the paper is completely dry you can apply masking if you are using it. Do not apply masking while the paper is wet because it can pull off the surface of the paper when you go to remove it.

Hope this Stretching Paper Tutorial helps. If you have any questions, please leave a comment and I will get back to you.

Friday, January 6, 2012

Have You Ever...A Look into the Everyday Life of an Artist

It has been a while since I posted a "Have You Ever", so I have decided to post three. I would love to hear your art related "Have You Ever's".

Have You Ever... been at an event where something else is going on besides art and started thinking about what colors to use to paint what you see?

Have You Ever... waited until the last minute to finish a painting, take pictures, and enter a juried show? (Now, in this day of digital entries, I have a quick way to enter a show... even if I have waited until the last minute!)

Have You Ever... forgotten to do the laundry, make dinner, or change out of your p.j.'s because you are so involved with the piece you are working on?

Saturday, December 31, 2011

Watercolor Video of Longs Peak, Happy New Year!

On this day, the 31st of December - 2011, I want to wish everyone a very Happy New Year filled with family, friends, and art! I have spent part of the day painting a watercolor on canvas of Longs Peak. I plan on ringing in the New Year by painting again tomorrow. I hope this inspires me to re-focus on my art and be less distracted by other things. I have attached a small part of the video I am shooting for the Longs Peak painting. Happy Painting to All!

Thursday, December 29, 2011

My Watercolors, Palette, and Brush

© LWatry 2011
    Some of my students asked for a list of the watercolors that are on my palette. So, I made up this image to show the colors I use and the brands of paint. I use 4 different brands of paint, but they are all professional artists grade, not student grade. The student grade paints have fillers in them. These chaulky fillers affect their look on the paper; they won't be as transparent as professional grade paints. Also, you may pay less for the student grade paints, but you tend to have to use more paint than with the professional paint. The key for the brand name abbreviations, under each paint name, is at the bottom of the image. (HINT: you can see a larger version of the image by clicking on it.)
    When I first set up my palette, many years ago, I used a book by Hilary Page - Guide to Watercolor Paints (see Amazon info). This book has information on each pigment and the brands that make them. It lists five factors: quality, reliability, lightfastness, handling characteristics and mixing potential for each of the paints. These can all be very important factors, especially lightfastness, when choosing your paints.
    I use a Stephen Quiller palette (see ASWexpress store). They come in plastic and porcelain and small (for travel) and large (for the studio). I like the large center well for mixing and the ability to set the paints up like a color wheel. I don't have my paints exactly as Mr. Quiller suggests, but it works for me.
    The brush that is pictured is the main brush that I use for most of my painting. It is a Golden Fleece Brush from Cheap Joes (see Cheap Joes store) and is a size #38. I have really liked this brush; it has a nice point for small areas and holds a lot of paint and water. This is not the only brush I use, but it is my favorite!

Wednesday, December 21, 2011

Watercolor Classes 2012

If you are in the Colorado Springs area and interested in taking a watercolor class, I have set up new classes for January to February. These classes range from beginner to intermediate/advanced. Please see the link to my website for class information. Watercolor Classes with Lorraine Watry.

Monday, December 5, 2011

Watercolor Project - Aspen on Watercolor Canvas

Aspen on Watercolor Canvas Demo4 LWatry ©2011
 I have finished the aspen on watercolor canvas. The following is a description of the final steps and the finished image. You can see the start of this painting at my post on November 11 - Watercolor Projects on Yupo and Watercolor Canvas.
Aspen on Watercolor Canvas Demo5 LWatry ©2011

If you have not tried watercolor canvas, it can be a fun surface to work on with watercolor because it is very easy to lift color back off. I also work a little faster on canvas because you have to be a little more direct with your colors and values. You can layer, but the previous layers might lift off if you are too vigorous with your brush.

Aspen on Watercolor Canvas Demo7 LWatry ©2011
I decided to mask out my foreground, large leaves because I wanted them to have clean hard edges. I could have gone back and lifted any errant color back off the leaves, but they would have had softer edges then and they may not have been as free of color as I wanted them. I finished up the shadows on the tree trunks before removing the masking on the leaves. For the distinct markings on the aspen trunks, I used a mix of French Ultramarine, Burnt Sienna, and Quinacridone Magenta. These three colors can be mixed to give gray blues, browns, and purples. I used these same colors on the small branches of the trees. I left the white of the canvas as the white of the trees accept for a very subtle brushing of a yellowing green in a few places to give the whites a "touch" of color.

The Demo7 image shows the completed painting. I used three shades of yellow and some green and orange to paint in the leaves. Sometimes while a leaf was still wet I would float in a second color to give interest to the leaves. I also left some leaves very pale so that they had the look of sunlight hitting them. The finishing step was to paint some purple/blue shadows on some of the leaves to give the painting more depth.

Aspen on Watercolor Canvas Demo6 LWatry ©2011

In the Demo6 image you can see the side of the canvas. I decided to paint the edge a dark brown with acrylics. Right now this painting is hanging just as it is with a brown edge and no frame. Some patrons like this look. So, I will leave it this way for a while. My other options are to frame it like an oil painting with a linen liner and a frame with no glass or you can get a frame that is specifically made for floating a canvas without a matt. (Here is one link to American Frame so that you can see what a floater frame looks like.) http://www.americanframe.com/search.aspx?prodtype=Frame&keyword=floater+frames
Aspen on Watercolor Canvas Demo8 LWatry ©2011

In the Demo8 image you can see the edge that is now painted brown and the whole canvas was then sprayed with 3 or 4 coats of acrylic matt sealer. This will protect the watercolor from ruin if it should get wet.

Watercolor canvas works with masking and salt if you like those techniques and probably many other techniques. I have decided that instead of buying the pre-stretched watercolor canvases, I like to buy big rolls of the watercolor canvas from online stores and then stretch it to the dimensions that I want to work with. Also, I have found that the roll of canvas has a slightly different feel that allows for an easier time working with it, while some of the pre-stretched canvases almost resist the paint. Note: canvas is still not as widely accepted by the buying public because I think some are unsure if it is an original painting or a reproduction. Some shows you enter may not allow canvas, so read the prospectus carefully.

Friday, November 11, 2011

Watercolor Projects on Yupo and Watercolor Canvas

Do you have too many projects lying around? It becomes difficult to focus with a lot of unfinished projects. I just finished teaching a class series focusing on aspen trees and now I have 4 demo paintings in various stages of completion that I need to finish up. I also taught a snow scene class earlier in the year with the idea that one of these paintings would become my Christmas card painting for this year. However, I never completed the painting. So, now that it is almost time to send Christmas cards, I am feeling the pressure to get this painting finished and printed. So, while I am in the process of cleaning up my studio and completing projects, I thought I could use these paintings as a blog demo. The following is a description of where I am in the process of painting.
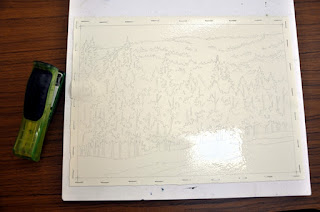
 This is my snow scene for my Christmas card. This painting is on Yupo (a plastic that is used for printing in some magazines). Working with Yupo for snow scenes is great because the paint sits on the surface and remains very vibrant and the whites are brilliant. I have a lot of this painting completed. I started by painting in the sky with a mix of cobalt blue and manganese and then I mixed a purple gray for the back ground trees. I wanted these trees to feel like they were in the distance and  thick with branches. I then painted the green pine needles, the trunks of the foreground trees, and the shadows on the snow. I used masking on the snow that is hanging on the branches. It is very easy to lift with Yupo, so I could have forgone the masking, but this will give me cleaner edges. I like making my Christmas card scenes quiet and peaceful. Sometimes I will add an ornament to a tree to spruce the scene up a little and give the idea that someone has been there, without actually showing a figure. This scene lent itself to a trail of ornaments that invite the viewer down the path in the snow.  My next step will be to soften some of the edges of the snow on the pines and put some shadows on them. Then I will finish up the trunks of the foreground aspen trees and I think it will be finished. I will post the finished painting, hopefully soon.
 This is one of the aspen paintings that I need to finish. This painting is on watercolor canvas. I stretched a piece of watercolor canvas around 12x20 inch stretcher bars to get the proportion I wanted of a long narrow painting. I then did my sketch directly onto the canvas and masked the foreground leaves to protect them while painting in the background and shadows on the tree trunks. I decided to use very strong sunlight in this scene and the white of the canvas is the white of the trees on the right side. The background sky and leaf foliage was painted in first. I painted the leaves in while the sky was still wet so that they would have a soft edge. Next I started putting in the shadows on the left of the trees and the branches. For the purposes of my in class demonstration, I skipped some steps and took some off the masking of the foreground leaves to demo how I would paint them (the shiny spot on this photo is some of the masking that still needs to be removed).
 In this close up, you can see the foreground leaves and a variation of color in some of them, to give more visual interest. I have also started to paint some of the darker markings that are found on aspen trees around the branches and on the trunk.

I will post more steps as I work to complete these two paintings and hopefully get some clutter out of my studio and off my mind!